Connecting the Arduino Uno to Azure Mobile Services
11 Jul 2014In this post, I would like to show you how you can easily use Azure Mobile Services to connect your Arduino Uno device to the Cloud. Mobile Services, as its name implies, is intended to provide a scalable and secure backend for mobile applications running on any platform. While we do provide SDKs for all major platforms, we do not have something you can use out of the box from an Arduino. However, as I will show you in this article, you can start using Mobile Services from your Arduino with just a few lines of code.
I am starting with the Uno because it is the entry-level prototyping board in the Arduino catalog, and I would like to see what we can do with this very minimal platform. It has 32KB of Flash memory to store your programs, but only 2KB of RAM, which is twice more than my good old Sinclair ZX81, but not enough to run any complex software! This means that we will have to keep our network access code very compact in order to leave some room for the “business logic” code you actually want to run on the micro-controller.
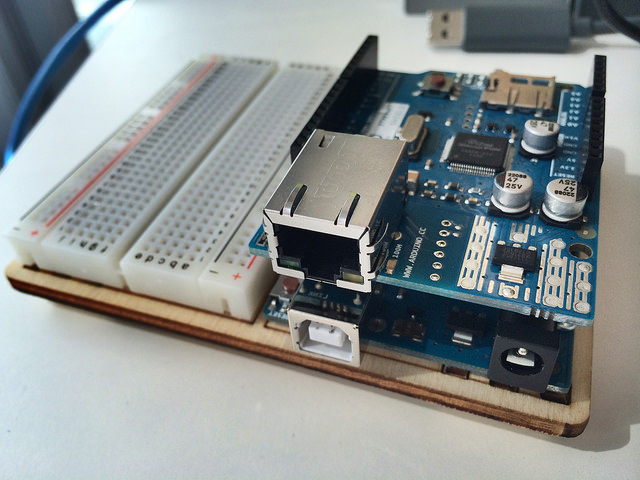
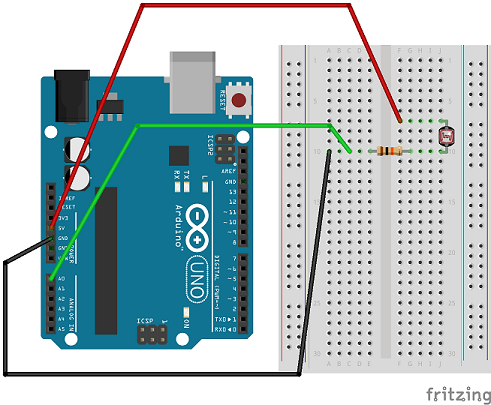
In order to connect to Azure from your Arduino board, you will of course need a network shield of some sort. I will be using the official Arduino Ethernet shield, but you should be able to use any compatible shield or a WiFi shield. As seen in the picture below, a shield piggybacks on top of your boad and allows you to access all the pins from the original board; here the Uno is seen with the quaintly artisanal wooden base and prototyping breadboard from the Arduino Starter Kit.
On the software side, we will use the standard Arduino IDE, which includes an Ethernet library to easily connect to network resources. If you look in the example sketches bundled with the IDE, you will for example find Ethernet - WebClient which shows how to emit a simple HTTP GET request to a Web server and read the response. We don’t need much more to connect to Azure Mobile Services!
Creating a Mobile Service backend
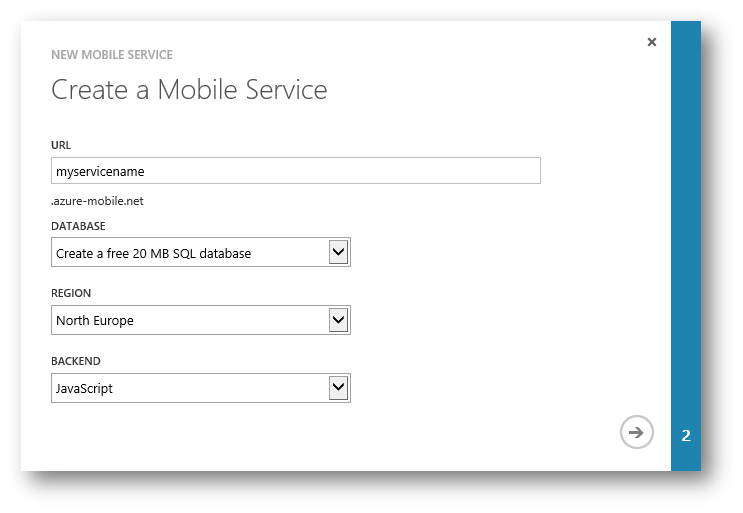
Creating a Mobile Service backend couldn’t be easier. Using the Web management portal, click on New, then Compute, Mobile Service, Create. You will need to choose a public URL for your service, a region where your service will be created, and the language you want to use: in this example I will use JavaScript. As part of the service, you are asked to create or connect to an Azure SQL Database that will be used to stored your data. If you don’t have a database yet, you can opt to create a free 20MB database.
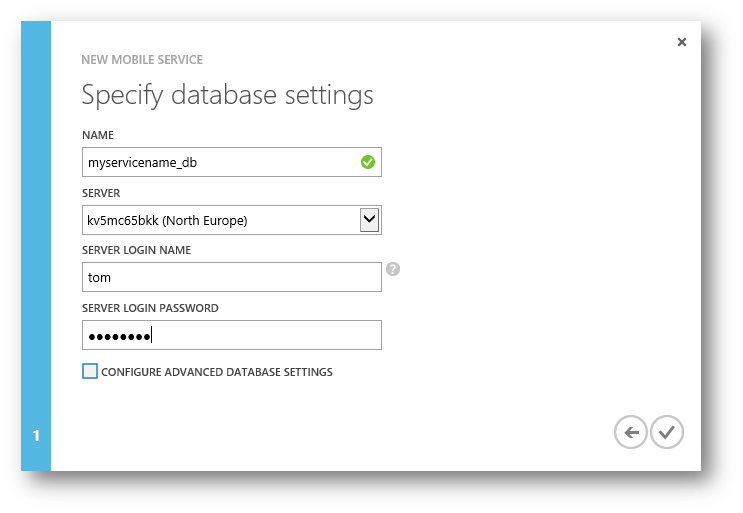
The next screen will ask you the details about your database: most importantly the server that will host it. You can choose an existing server if you have one, or create a new one on the fly (in this case you will have to select a login/password combination).
If you are more of a command-line person, you can also use our command-line tools on a Mac, Linux or Windows system. First you should use azure sql server list to find an available SQL Server instance:
azure sql server list
This will display a list like this one:
info:    Executing command sql server list
+ Getting SQL server
data:    Name        Location
data:    ----------  ------------
data:    kv5xxxxbkk  North Europe
info:    sql server list command OK
Then then azure mobile create command to create a new Mobile Service backend using that server:
azure mobile create myarduinosvc --sqlServer kv5xxxxbkk \
--location "North Europe"
The output will look like this:
info:    Executing command mobile create
SQL administrator user name: xxx
SQL administrator password: ********
+ Registering for mobile services
+ Creating mobile service
info:    Overall application state: Healthy
info:    Mobile service (myarduinosvc) state: ProvisionConfigured
info:    SQL database (myarduinosvc_db) state: Provisioned
info:    SQL server (kv5xxxxbkk) state: Linked
info:    mobile create command OK
Creating a Table
Now that your service is created, you can explore the options using the management portal.
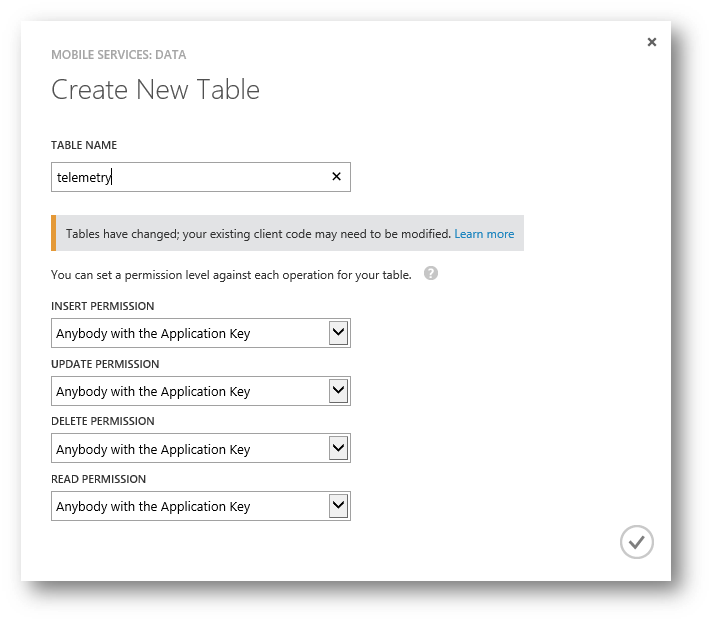
Mobile Services offers a built-in NoSQL data API in the form of simple tables. Since we want to send some data, let’s create a new table: in your service management page, go to the Data tab, and click on the big “+” sign at the bottom of the page to create a new table. Since this is NoSQL, all you need to do is to give your table a name: we don’t have to specify a schema for the data. We are going to ignore permissions for the moment, but as you can see in the interface you could restrict access to the insert/update/delete/read operations.
Once your table is created, it is very simple to insert data using the Mobile Services REST API. Before you can send requests though, you will need to retrieve your Application Key, which is used to authenticate the API calls. You will find it from the Dashboard page, using the “manage keys” button at the bottom of the screen. The little popup that shows up will display two keys, and you will need to copy the “application” one.
Now you have all the elements you need. If you have cURL installed, you can insert a record from the command line like so:
curl -v -X POST -H Content-Type:application/json \
-H X-ZUMO-APPLICATION:xxxxzKyLxxxxRxiAxxxxWkrixxxxFa50 \
-d '{"test": 42}' \
http://arduinouno.azure-mobile.net/tables/telemetry
The X-ZUMO-APPLICATION header contains your application key. As you can see in the URL, my table is named “telemetry”. The body of the POST request just needs to contain a valid JSON object that will be persisted in the table.
Calling the Data API from the Arduino
And now for the main item on the menu: the Arduino code to send the telemetry data using the REST API! For this example I am using a simple test setup with a photoresistor to send some data every second. The photoresistor is connected to analog line 0 (A0).
In the code below, I am using the Ethernet libray to open a connection to the Azure Mobile Services endpoint and send the HTTP POST requests to store the values read from the photoresistor into our table. If you want to run it, you will need to change the following variables as explained in the comments:
serveris the address of your Mobile Services endpoint.table_nameis the name of the table you created above.ams_keyis your Mobile Services application key- you should also probably change the MAC address in
macfor the Ethernet shield (your MAC address is usually on a sticker at the back of the shield)
You could also look at line 59, where I hard-coded the name of the JSON object property to “value”. This will become the name of column where the data is stored.
Here is a quick overview of the different functions in the code:
setupinitializes the Serial port and the Ethernet shield using the DHCP method (you should have a working DHCP server on your network).loopreads the sensor value on line A0 and then calls the following network functions.send_requestis where most of the work happens. A TCP connection is established to the Mobile Services endpoint, and the HTTP POST request is emitted. The headers are the same as shown in the cURL example above, e.g. theHostwith the name of your endpoint, theX-ZUMO-APPLICATIONkey, and the JSONContent-Type. The body contains a simple JSON object with the value from the sensor.wait_responsejust blocks until some bytes are available on the connection.read_responsewill read all the response bytes, and just print the HTTP response code to the serial console for debugging.
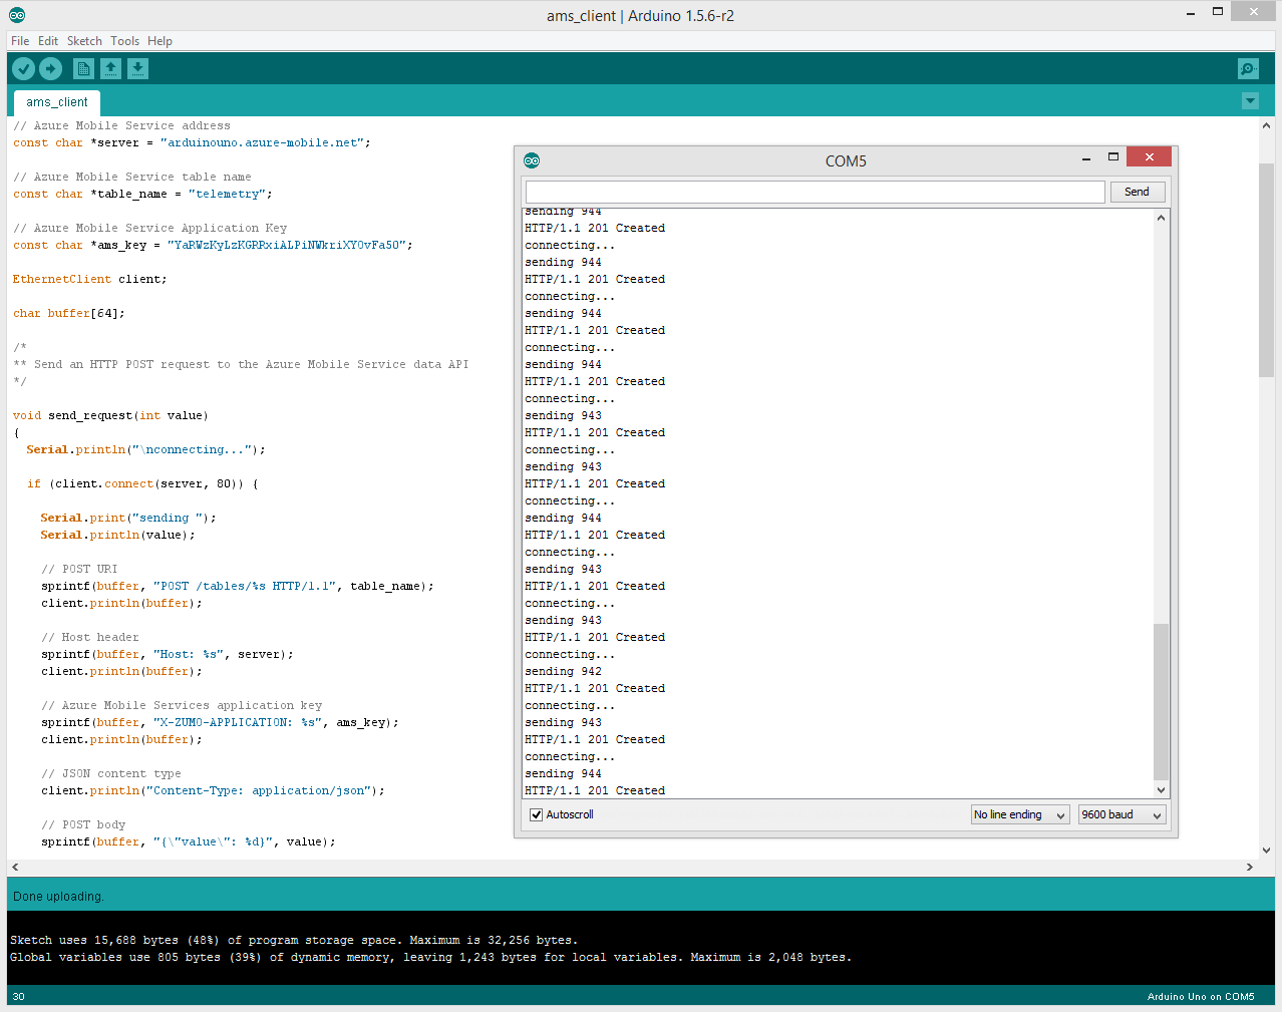
Below a screenshot of the program running in the Arduino IDE, with the Serial Monitor open.
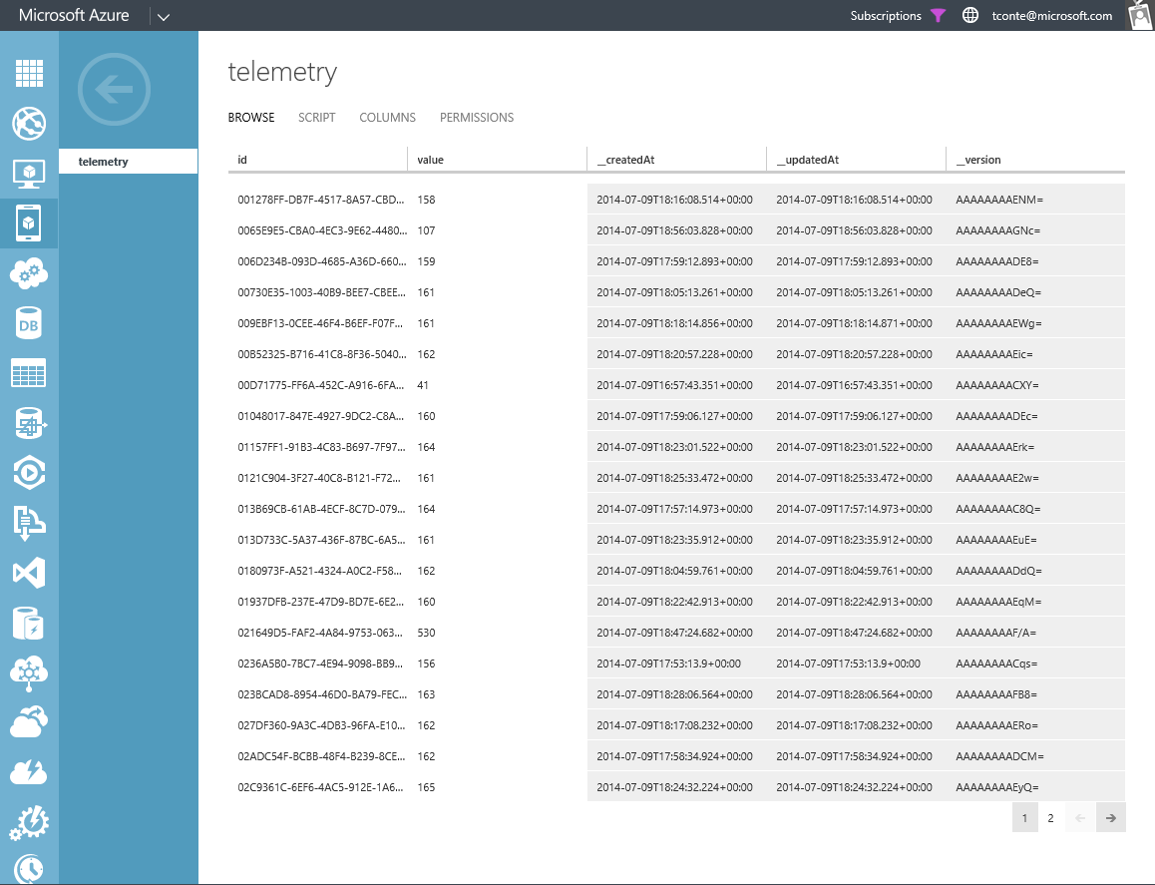
Accessing the data
If you want to look at the data, you can browse it directly from the Data tab in the administration page.
Where this technique falls short
As you can see, it is very easy to collect data from your Arduino using Azure Mobile Services. But there is one big problem with this approach: since all our communication is done in the clear using plain HTTP request, it would be very easy for a malicious user to intercept our Application Key and use it to insert bogus data into our table. This could lead to denial-of-service attacks or worse, depending on the type of data you collect!
I will try to explore, in future blog posts, some more secure methods to talk to the cloud; the main problem being the limited computational capacity of the micro-controller in the Arduino Uno, which makes it impossible (or at least very hard!) to run a full encryption stack like SSL.