A simple smart contract Web UI using web3.js
21 Jun 2016After deploying my first smart contract on a private Ethereum blockchain, I wanted to start developing a small UI so I could see what was happening without having to watch a bunch of terminal windows!
Once again, I started from scratch so I could experience the basic techniques required. You can find the source code on GitHub, with some intructions on how to set it up if you want to try it.
I decided to start with a simple HTML page, running locally on my PC, and interacting with a local geth client connected to my private chain. This is very easy to setup, all you need to do is follow on your PC the same steps we used in the previous articles for the Raspberry Pi. Then you need to tell geth to start the RPC interface and allow incoming requests:
geth --networkid 42 --nodiscover --rpc --rpccorsdomain "*" console
Then you will use Ethereum’s JavaScript API, called web3, to interact with the Ethereum node. First you need to connect to the local node:
var web3 = new Web3(new Web3.providers.HttpProvider("http://localhost:8545"));
Once you got your web3 object, you can start calling some APIs to find out what is going on in the blockchain. In my case I am simply updating a couple of labels on my Web page (using jQuery) so I have some information about my account. For example, to display your ETH balance, you can use:
var balanceWei = web3.eth.getBalance(account).toNumber();
var balance = web3.fromWei(balanceWei, 'ether');
I am also displaying the current block number so we can see the blockchain grow:
var number = web3.eth.blockNumber;
Calling smart contract functions
The next step was to display some information returned by my smart contract’s functions, getEnergyAccount() and getCoinAccount() (see the previous article for the details). This is a little bit more involved as it requires getting hold of the contract’s ABI (Application Binary Interface) in order to interact with it.
I used the browser-based Solidity compiler to generate the ABI, and saved it in a separate file abi.js that I can load from my application into the abiArray variable. I also need the smart contract address, in the contractAddress variable. I can then get hold of a JavaScript instance for my contract:
var contract = web3.eth.contract(abiArray).at(contractAddress);
And then I can call my functions:
var coinBalance = contract.getCoinAccount.call();
var energyBalance = contract.getEnergyAccount.call();
Note that these are function calls, not transactions: they are read-only and thus do not modify the state of the blockchain. This is why I can call them directly and get the result synchronously: they will be executed on the local node. I will wire up my transactions in a future article!
Introspecting the transactions
The next thing I wanted to be able to display in my UI is a log of the transactions, including the input parameters, so I can easily visualize the activity being performed on the blockchain by all the other participants.
It is fairly easy to log all transactions by setting up a filter that watches the latest blocks, then extract some block metadata and also all the transactions stored in the block:
var filter = web3.eth.filter('latest');
filter.watch(function(error, result) {
  var block = web3.eth.getBlock(result, true);
  console.log('block #' + block.number);
  console.dir(block.transactions);
}
A transaction object looks like this:
{
	"blockHash": "0x361464a30ecc10640fd859bc90844a30f0ddff561e6805fb657aff0567da7b4f",
	"blockNumber": 131494,
	"from": "0x4cf24bf15bfead008b22ea33b7c99a82326031a7",
	"gas": 90000,
	"gasPrice": "20000000000",
	"hash": "0xa11e9aa7aff1bd6cb6c7d886cc531e75a8bcdea1ddcf387937aae3f3a0addb20",
	"input": "0x4326ee36000000000000000000000000000000000000000000000000000000000000034b",
	"nonce": 1477,
	"to": "0x58b671784f4fa6b02e3dcac9f9dd215b66b5669b",
	"transactionIndex": 0,
	"value": "0"
}
As you can see the input property, which is where the arguments to the transactions are stored, is not exactly readable as is: it needs to be decoded to figure out which function was called, and what the parameters were.
Fortunately the format is well described in the ABI documentation, and there are a couple of internal web3 classes we can use in order to facilitate the decoding.
First, let’s figure out what function was called. The first four bytes of our input string represent a hash of the function signature. I am using this small function to iterate over all the functions in the smart contract (using its ABI) and calculating the signature hashes:
function getFunctionHashes(abi) {
  var hashes = [];
  for (var i=0; i<abi.length; i++) {
    var item = abi[i];
    if (item.type != "function") continue;
    var signature = item.name + "(" + item.inputs.map(function(input) {return input.type;}).join(",") + ")";
    var hash = web3.sha3(signature);
    console.log(item.name + '=' + hash);
    hashes.push({name: item.name, hash: hash});
  }
  return hashes;
}
Now, given a function hash from the input data, I can lookup the corresponding function name like this:
function findFunctionByHash(hashes, functionHash) {
  for (var i=0; i<hashes.length; i++) {
    if (hashes[i].hash.substring(0, 10) == functionHash.substring(0, 10))
      return hashes[i].name;
  }
  return null;
}
Now, we need to parse the arguments as well. For this, we will need to use an internal web3 class, SolidityCoder. This is why I had to introduce Browserify in the project, so I could load the corresponding module:
var SolidityCoder = require("web3/lib/solidity/coder.js");
Now I can parse the arguments passed to the function, again based on the ABI:
var inputData = SolidityCoder.decodeParams(["uint256"], t.input.substring(10));
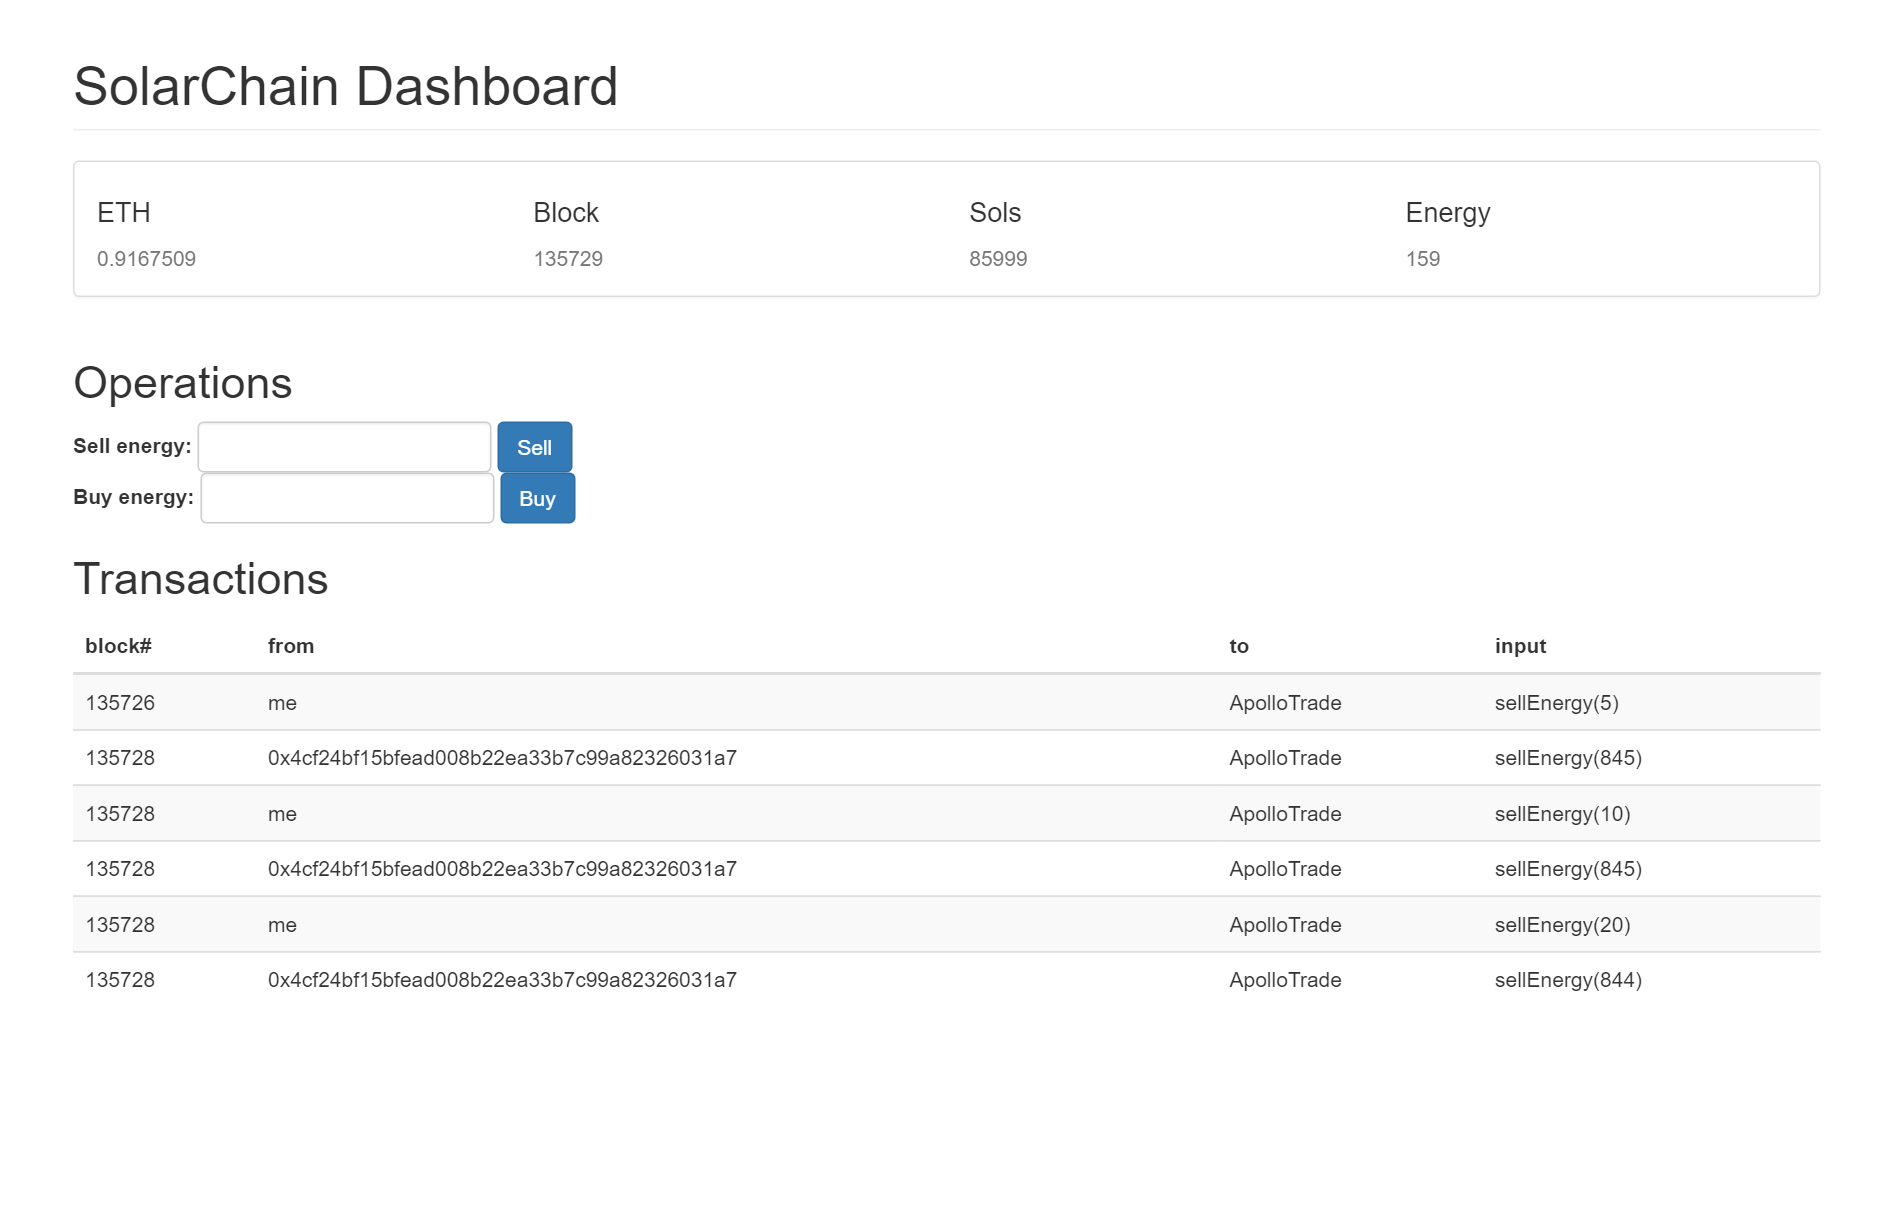
And this is the final result, showing the various bits of information about my account, plus a log of the transactions that were observed. As you can see, I can identify the smart contract as well as myself, however for all the other transactions I am merely displaying the account addresses. You can see the function parameters being properly decoded, which allows me to see what transactions are being executed within my blockchain.